Intro
This one by far one of my favorite courses that I’ve ever taken! I had previously learned the basics of Adobe in Foundations of Graphic Communications, but this course really helped me take things to the next level. I definitely honed my skills in Adobe Illustrator, Photoshop, and InDesign, and had so much fun while doing it because I could let my imagination run wild! Having this kind of creative freedom and learning while doing it was such an incredible experience, and I thank my teacher, Kristen Smith (who also taught me PR Comm), for being such a great instructor!
Below are three of my favorite projects from this course and the rationale behind why I chose that design.
Package Redesign
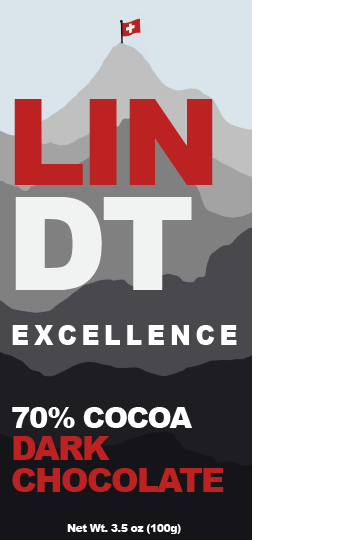
Before I began the package redesign, I did some research on the history of Lindt in hopes of getting some inspiration. When I found out that the company originated in Zurich, Switzerland, I immediately reflected on the time I vacationed there when I was younger. The most pertinent image in my head was the beautiful Swiss Alps and vibrant red and white flags I saw displayed all over the city.
When I look at the current Lindt chocolate bar design, I don’t really see any elements reflecting the company’s history or origin. The design is pretty generic. I always feel more connected to a brand when they display some type of personal element in its design, so that’s why I thought of adding the mountains and swiss flag was important. I wanted the artwork to signify that Lindt is a brand that is proud of its origin and that Lindt chocolate comes from a beautiful and picturesque country with a rich history.
As for the design, I wanted to keep the illustration pretty clean and solid because I knew that there would be a lot of important copy on it and I didn’t want it to get too busy or become unreadable. Therefore, I thought a minimalistic graphic look would help me meet my design goals, especially since graphic designs usually have a bold pop of color and I knew that I would be using bright red in my work (because of the Swiss flag). I liked the thought of having a grayscale background with pops of red, so using gray mountains as the background of the design worked perfectly. I drew this background and I included the swiss flag to add some more recognition of the country.
I chose the font, Arial Black, because it is an easily readable, minimalistic typeface, and it is very thick so it would stand out against the mountain backdrop. I also chose it because I knew that I wanted to split the word “Lindt” up into two lines so it would look more interesting/typographic, so I needed to make it rather large to look right. I chose the colors red and white for the text to reflect the colors/pattern of the flag, and also because it added contrast against the background. By alternating red and white-colored words, I think it creates repetition and carries the eye down the design.
The red color also helped me impose a hierarchy as it made what type of chocolate the bar was stand out so it’s easy for the consumer to spot. I also employed a hierarchy by making the company name biggest, “dark chocolate” second biggest and “excellence” and “70% Cocoa” smallest. I made these choices because I think the brand name and type of chocolate bar are the most important information. In terms of proximity, I grouped “Lindt” and “excellence” together because those words describe the brand, and then “70% cocoa” and “dark chocolate” together as those describe the kind of chocolate bar it is.
Repeating Pattern
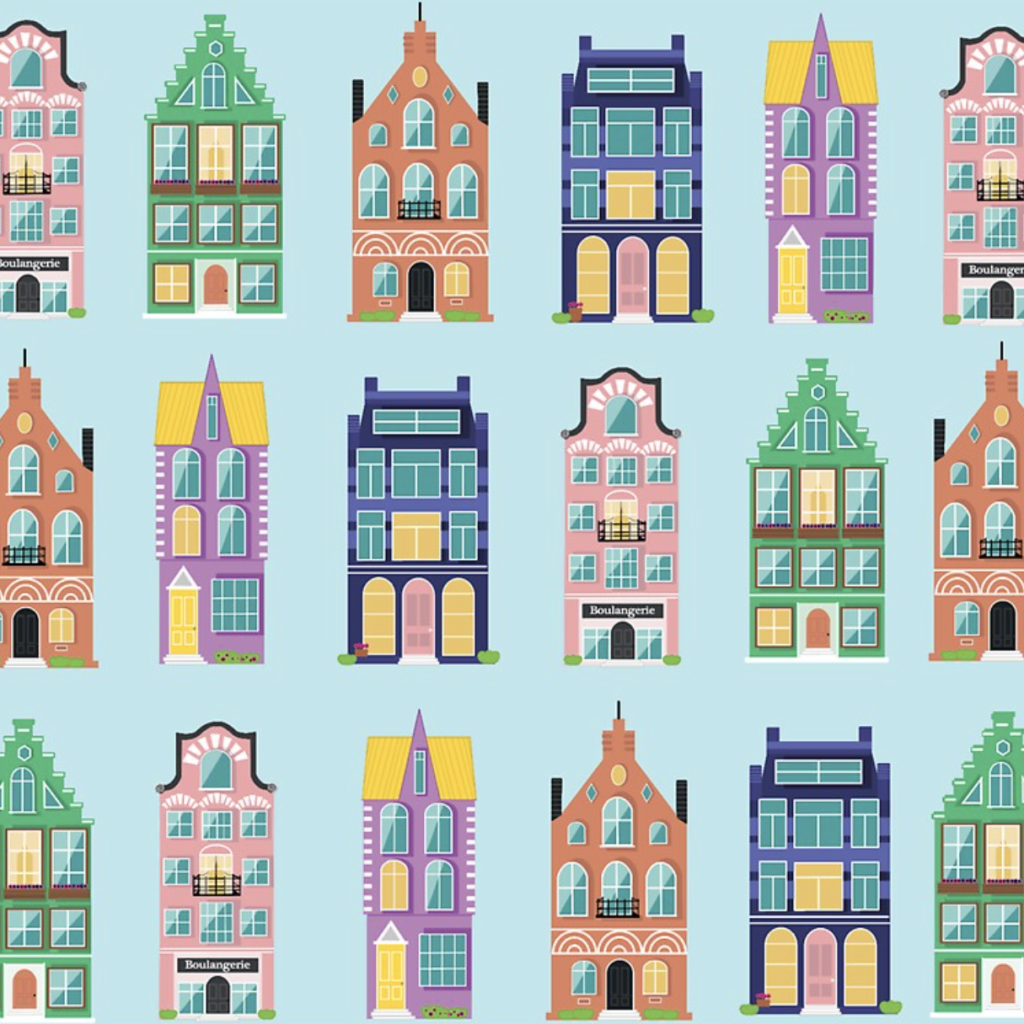
I decided to create this particular pattern because I’ve always loved the unique architecture of european buildings. I was particularly inspired by the picture below, which is in Amsterdam, Netherlands. The closeness and number of the buildings reminded me of a repeating pattern, and I thought buildings would be really fun to make because I could design each structure in a distinctive way.
To create this pattern, I first made a layer with a picture of buildings in Amsterdam, similar to the one below, and began constructing the form on a new layer with shapes such as rectangles, squares and circles. I used the pen tool to create non-geometric configurations, such as the roof lines. I then took the shape builder tool and joined all of these elements together into one structure. I used the rectangle, circle and diamond tools to create windows along with the pen tool for triangular windows. I put highlights on the windows (using the pen tool to make triangles) to create the illusion of sun hitting the glass, and added shadows that would cast off the thick molding around the windows. I used the line tool, pen tool and shape tools to add details like the molding, balconies, window blinds and decorative stripes and semicircles. I used the circle, rectangle and line tools to create the flowers, flowerbeds and bushes for added detail.
As far as colors, I wanted the design to be bright, fun and clean so I went with pink, blue, purple, terracotta and green. I thought a light blue background would contrast enough with these shades while still adding color to the pattern. I put one or multiple yellow windows of the same shade in each house to tie them all together, add more contrast and signify that someone was home.
I would have put this pattern on an iPad or laptop case because I think an iPhone would be too small to show the whole pattern or the pattern would have to be made so small that you couldn’t see the details. I could put the pattern on other items, but I think it might be a little too busy, and a device case would suit it most. According to Market Research.com, the majority of iPad uses are aged 35-44, and 23% are 25-34. Therefore, I think ages 25-44 would be a good age range to market to. I think this age range would appreciate the architectural elements and overall style.
Editorial Project
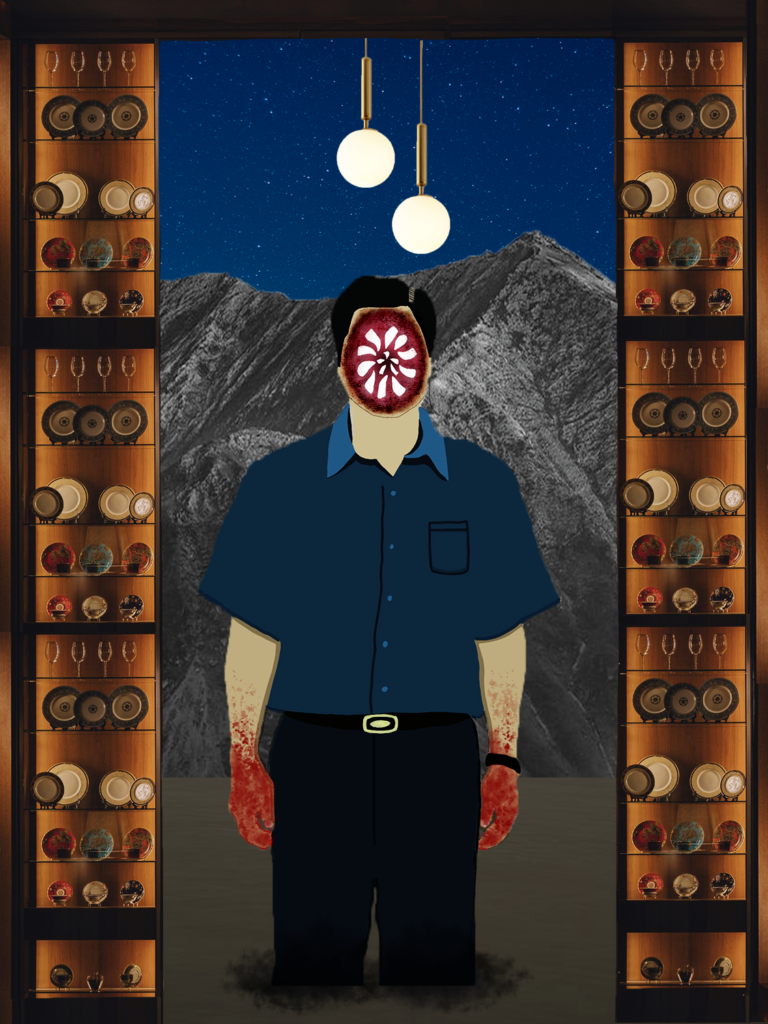
For my editorial project, I chose “PARASITE” EXPLORES WHAT LIES BENEATH” published by the New Yorker. While I have not seen the movie yet, by reading the article and looking at still images of the film, I found several symbols that I incorporated in my work. The focal point of my design is the poor father, Kim Ki-taek. I made him bigger than the mountain to make him look like he was in the forefront of the image or “closer” to the viewer. I chose to put him in graphic because I imagine him as the head of the poor household (and also one of the more savage members of the family), and therefore would represent the entire Kim family in this graphic.
I personally interpreted the poor family as the “parasites” and the rich family as the “hosts” because the poor family tries to infiltrate the lives of the rich. Therefore, I drew a parasite mouth onto the face of the Ki-taek to symbolize this. I added blood on the father’s hands to symbolize the bloody climax of the film (I won’t elaborate because of spoilers). I tried to make his stance very neutral and non-aggressive to juxtapose with the scary face and bloody hands. I felt like that would make it more ominous. I decided to draw Ki-taek because I like to look of mixed-media in collages and I couldn’t find an image of a parasite mouth without it being too gross. For the background, I added the dirty water the Ki-taek is standing in because, during a giant storm, the poor family’s house got majorly flooded.
I added a hue mask to an image of still water to create the appearance of floodwater. The rock formation in the background is supposed to represent the scholar’s rock, which is a reoccurring symbol in the film, and it’s supposed to “bring material wealth to families,” which happened to the Kim family after they acquired it. Framing the scene is the display cabinet in the rich family’s house that was a popular setting in the movie, and also present when a lot of sinister action takes place, such as creepy figures popping up between the cabinets, including Ki-taek, so I thought it would be fitting to place him there. I struggled a lot with the cabinets because the still image I took them from was not the right size and asymmetrical. Therefore, I had to splice together A LOT of different sections to form a symmetrical cabinet that would run the entire length of my graphic. The lights hanging from it in my design are also a feature of the display cabinet in the film and flicker to deliver morse code. I added soft light adjustment clippings to all of the elements to make them a little darker and more sinister and used warm and cool colors (such as the blue sky, gray mountain, and blue shirt versus the orange-hued cabinets, red parasite mouth, and red blood) to contrast and make each element pop. Overall, I was really going for a creepy and foreboding look to symbolize the movie’s plot.